
Eastern Florida State Simulated Spacecraft Vacuum Loading

Team members required: Three
Description:
This event simulates the loading of a small quantity of a hazardous commodity from a holding tank into a space vehicle flight tank. The (2) individuals performing the procedure will be required to don the proper PPE, assemble a mobile fluid transfer station per a detailed procedure and a schematic and transfer 150 grams of a commodity (colored water) from a holding tank to a flight tank using a vacuum loading operation. A command/response protocol (see definition below) must be followed when completing the operation. Upon completion of the fluid transfer all system lines will be evacuated using compressed air (60 seconds) and disassembled from the station.
(Note: The Flight Tank does not drain during line evacuation).
The QDs we are using are a push/pull type connector (explain inserting and pushing until it bottoms out and then how they have to push on the collar to get it to release the tubing). One will be available at the event table prior to the event for the technician to look at and operate to familiarize themselves on how it works.
All steps must be completed. There are no provisions for NOT PERFORMING a step or series of steps.
Definition of Command/Response Protocol- a method of communication in such a manner that the command or work instruction is read by one individual (command) and then it is repeated (response) by the person performing that work step as they complete the instruction.
Tools and equipment list:
- PE provided for the (2) individuals performing the procedure o Tyvek suit (simulates SCAPE Suit)
- Disposable Polypropylene Coveralls with Hood and Booties o Neoprene gloves o Face Shields o Disposable Respirator o Painters Tape
- Equipment provided
- Control Box (3) (plus 3 AC to DC adapters)
- Vacuum Pump w/gauge
- Air compressor plus one 3 way adapter and 2 hoses o Compressed air-pressure regulator o Supply tank
- Flight tanks
- Vacuum & Fluid Lines (6 Tygon tubes cut to 4 foot lengths each)
- Digital Scale
- Poly-Temp PTFE Thread Tape
- Tool Bag and Tools o Tube Bender o Tube Cutter
- 37 Degree Flaring Tool
- Fitting Box
- Spare Tubing
- Box Cutter
- Needle Nose Pliers
- Tape Measure
- Phillips and Flathead Screwdrivers
- 2 Adjustable Wrenches
- Wire Cutters
- Slip Joint Pliers
- Scissors
Instructions:
A) Preparation and protocol
- The operators (team member 1&2) will dress out in appropriate PPE to simulate the protective equipment used during such an operation.
- The Test Conductor (Team member 3) will read out the procedure while team member operator performs the operation. The “call and response” protocol referenced above must be used. That is, Test Controller will read out the step, and Operator gives an appropriate response to verify the step is complete. For example, if the Test Conductor reads off ‘Close Valve 1”, the Operator will close the valve and respond “valve 1 closed” completing the step.
B) Set up (Reference Figure 1)
Test Conductor Commands and Operator 1 Performs the steps.
-
-
-
-
-
-
- Turn on power to Control Box
- Cycle electrical valves to ensure operation (red light indicator)
- Verify all valves (manual and electrical) are closed
- Turn off power to the Control Box
- Connect Vacuum and Fluid lines as shown in schematic (Figure 1)
-
-
-
-
-
Note: all fittings are push lock type. Ensure lines are pushed in all the way. The compressed air line to pressure valve will already be connected.
-
-
-
-
-
-
- Verify all Vacuum and Fluid lines are connected as shown in schematic (Figure 1)
- Verify Flight Tank is on digital scale.
-
-
-
-
-
C) Evacuate Tank
Test Conductor Commands and Operator 1 Performs the steps.
-
-
-
-
-
-
- Turn on power to Control Box
- Open MV 4
- Start Vacuum Pump
- Open Vacuum Valve
- Open Flight Valve
- Open MV2
- Evacuate system until vacuum gage reads at least 22 Hg +/- 5
- Close Vacuum Valve
- Close Flight Valve
- Close MV 4
- Turn off Vacuum pump
-
-
-
-
-
D) Flight Tank Load-Vacuum
Test Conductor Commands and Operator 1 Performs the steps.
-
-
-
-
-
-
- Turn on digital scale and tare
- Open Atmospheric Vent Valve
- Open Supply Valve
- Open Flight Valve and cycle valve as necessary to meter 150 grams of fluid into Flight Tank NOTIFY JUDGE WHEN COMPLETE
- Close all valves (manual and electric)
-
-
-
-
-
Note: If Vacuum load was unsuccessful, Step E-System Drain must be completed before restarting step C- Evacuate tank
E) System Drain
Test Conductor Commands and Operator 2 Performs the steps.
-
-
-
-
-
-
- Verify all valves closed (manual and electric)
- Adjust and verify compressed air regulator set at 20 +/-5 psi
- Open MV3
- Open MV1
- Open Atmospheric Vent Valve
- Open Flight Valve
- Open Supply Valve
- Open Pressure Valve
- Purge all water from system for 60 seconds (use timer provided) Note: FLIGHT TANK DOES NOT DRAIN
- Close Pressure Valve
- Close Supply Valve
- Close Flight Valve
- Close Atmospheric Vent Valve
- Close MV1
- Reduce compressed air regulator to zero
- Close MV3
- Open MV2 to vent Flight Tank
- Open MV1 to vent Supply Tank
- Close all valves (manual and electric)
- Turn off power to Control Box
-
-
-
-
-
F) System Clean up
Test Conductor Commands and Operator 2 Performs the steps.
-
-
-
-
-
-
- Verify power to Vacuum pump and control box is turned off
- Verify all valves closed
- Disconnect all hoses between control panel and tanks (both ends of all 6 hoses must be disconnected)
-
-
-
-
-
END OF EVENT
Participants should remove PPE and return it to the PPE staging table
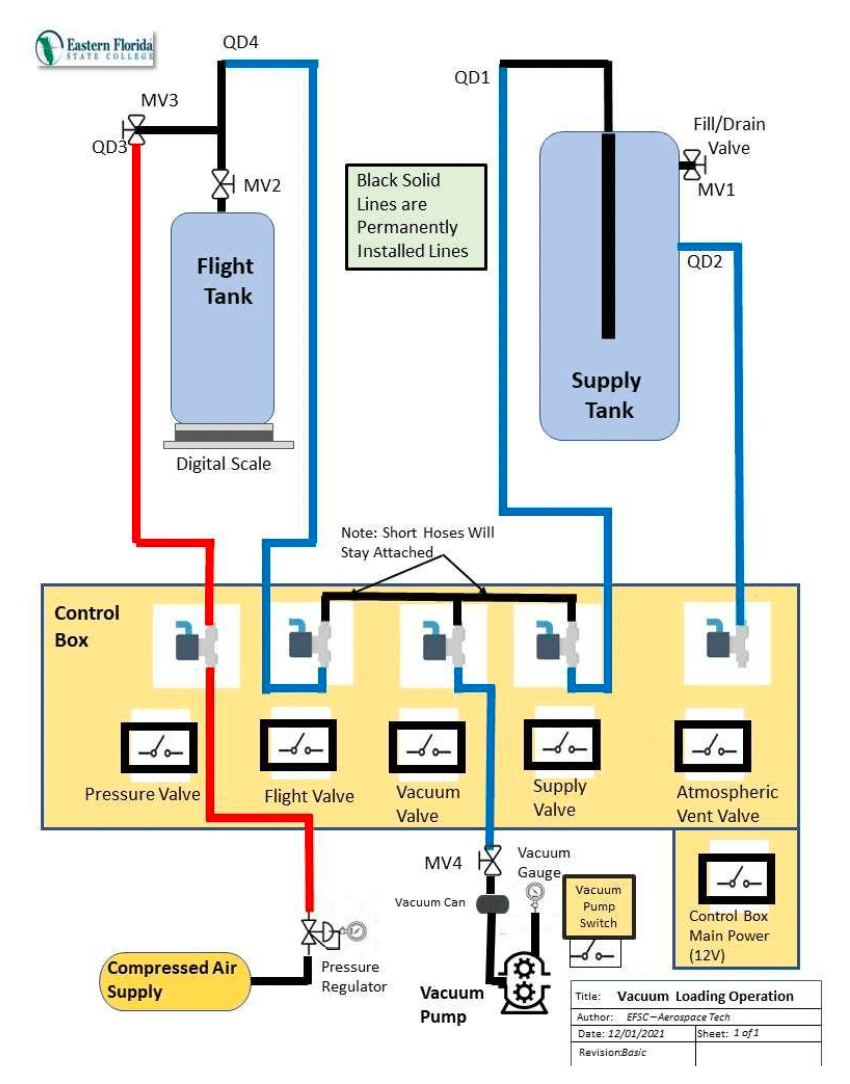
Figure 1 : Space Vehicle Vacuum Loading Operation
Scoring:
Scores will be calculated according to the standard score sheet.
- Bonus of 30 seconds for proper use of command & response
- Bonus of 60 seconds for exact loading to 150 grams.
- Penalty of 60 seconds for each step not completed.
- Penalty of 15 seconds for each gram over or under required load of 150 grams.
For More Information: